How to do your First 10 Muscle Ups (for Beginners)
Getting that last bit over the bar can leave you feeling hopeless.
We’ve all been there, and we’ve all been told that if we can do 10 pull ups, we can muscle up.
But it’s just not that simple right? You’ve probably been trying for months, and still no luck.
To make sure nobody ever struggles to muscle up again, this guide will show you…
- The exact muscles you need for the muscle up
- How to go from never touching a bar, to 10 muscle ups
- Simple ways to stay motivated, and stop doubting yourself
- How to adapt the progression to your setup
What are muscle ups?

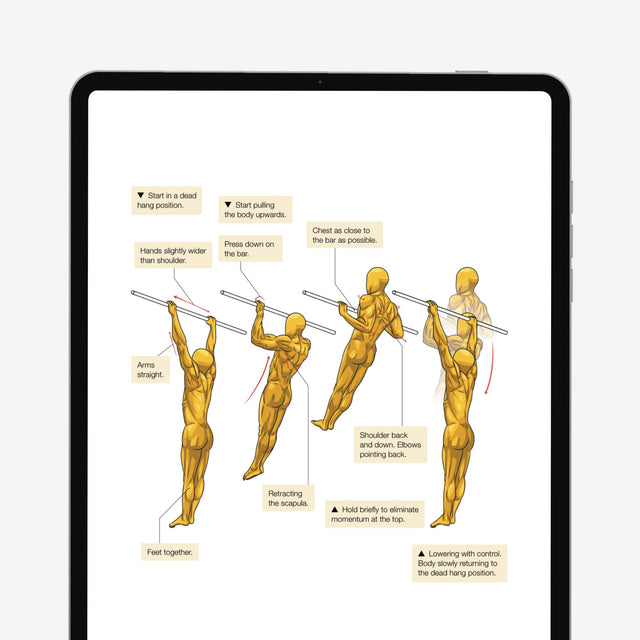
Muscle ups are a high pull up that transition into a straight bar dip. And rely mostly on lat and lower chest strength.
But the true meaning of a muscle up is the dedication needed to master it. It’s about showing your discipline. And proving you can do anything you set your mind to.
This is why “muscle” ups are called that for a reason. You need to build some muscle before doing them. Otherwise you’ll “chicken wing”, and injure yourself.
That's why we’ve put together the exact steps to progress your strength. And achieve this sought-after calisthenics move.
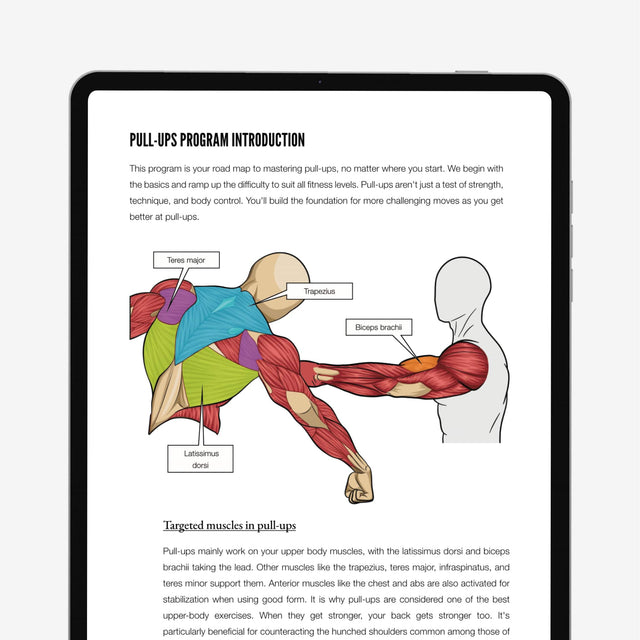
What muscles do muscle ups work?

Muscle ups hit a lot of areas, including the:
- Chest (upper and lower pecs)
- Lats
- Triceps (medial, lateral, and long heads)
- Biceps (short and long head)
- Forearm flexors
- Shoulders (front and rear deltoids)
- and rotator cuffs
The lat and chest strength will get you over the bar. And the other muscles involved are more about control and stability than anything.
You want to understand that muscle ups aren’t just a fancy gymnastics move. They’ll give you massive gains. Just think about how long people struggle to get it.
As you know, you need lots of strength to do them, so training muscle ups will build muscle very effectively.
A nice bonus of muscle ups is reducing the time on your weekly training. As you can eventually use them to replace dips and pull-ups. All in one move.
How to train for muscle ups

Since muscle ups need a little more strength than you’d think, we’ve broken it down into a 4 step progression:
- Step 1 - Go from never touching the bar to basic pulling strength
- Step 2 - Develop key upper body strength to later help the muscle up transition
- Step 3 - Get stronger in the full range of motion
- Step 4 - Unlock the full muscle up without kipping (grinning from ear to ear)
- BONUS Step - Reach a new level and ascend past the regular muscle up…
Each exercise has the muscle up in mind. And after you can do each of them, the easier you can do the muscle up.
You’ll never struggle with muscle ups again after taking these steps. And the correct “hook” form will come naturally with the strength you’ve earned.
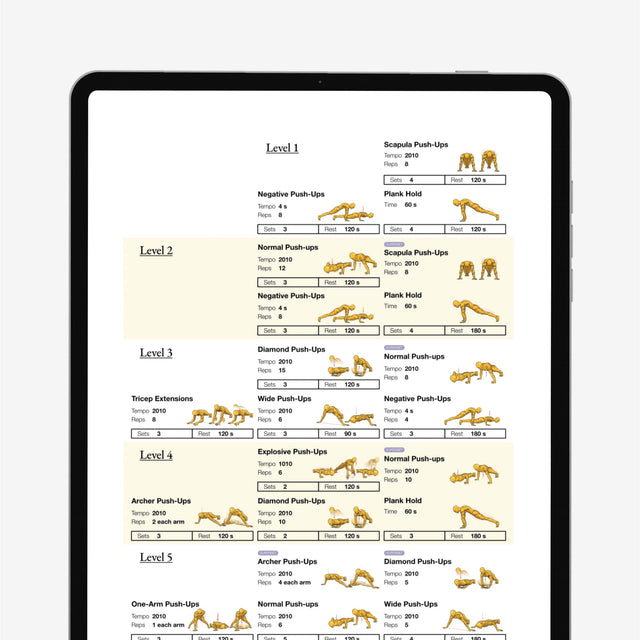
How to choose and progress your sets and reps

For every exercise you haven’t done before, start with 3 sets of 6-8 reps. This will make sure you challenge yourself, while still being able to do it as a beginner. And as it becomes easier with every workout, you’ll change it like so...
- 3 sets of 6-8 reps
- 4 sets of 8-10 reps
- 5 sets of 10-12 reps
- 3 sets of 12-14 reps
- 4 sets of 14-16 reps
- 5 sets of 16-18 reps
If you can do 3 sets of an exercise for 8 reps (with no sweat), then you want to start doing 4 sets of 8-10 reps. And so on, all the way up to 5 sets of 18 reps.
Then one you’ve reached 5 sets of 18 reps, either move onto a harder exercise, or start adding weight 5kg at a time.
Something you need to do for every rep is “tempo”. Where you count each part of the movement. Which will mean you know how much time under tension you’re doing for each rep.

The best tempo for strength is 4-1-2-0:
- 4 seconds in the eccentric phase (e.g. lowering a pull up)
- 1 second hold (e.g. dead hang)
- 2 seconds in the concentric phase (e.g. pulling up)
- 0 seconds hold (e.g. top of pull up)
You might be wondering about static exercises like the dead hang, which don’t have “reps” as such. What you do here is calculate how long you hold. Do this by multiplying the tempo for each rep by the total number of reps.
For example: 6-8 reps multiplied by 7 seconds (4-1-2-0 tempo is 7 seconds total), is 42-56 seconds. So you’d hold on for at least 42 seconds, and no more than 56.
Follow this reference for every exercise. Especially if you always want to build muscle while avoiding injury.
Step 1 - Go from never touching the bar to basic pulling strength
The only exercise for the muscle up that makes sense as a beginner is the straight arm lat pulldown. Since perfect muscle ups need the lats to be strong.
Straight arm lat pulldowns (using a resistance band)
- Tie a resistance band to a firm object above you
- Grab the band with both hands
- Take one or two steps back so the band is under tension
- Keep your arms straight, with a slight bend at the elbows (to avoid locking them)
- Pull the band down to your waist over 2 seconds, keeping (mostly) straight arms
- Hold for 1 second
- Relax your lats and reverse the motion over 4 seconds
- Immediately start the next rep
- Repeat for 6-8 reps
- Do 3 sets, with 40 seconds rest in-between
You should mimic a kind of “slamming down a car trunk” movement. Which is how you get over the bar in a muscle up.
When finding something to attach the band to, you can use:
- A pull up bar
- A smooth tree (not rough bark, will snap the band)
- Some strong railing
- A tall fence post
- Closing a window or door to hold the band in place…
Or whatever sturdy object you can find. The only requirement is that whatever you attach the band to won't break when you use it. As the the band’s tension gets stronger the more you pull on it.
If the exercise is too hard, use a thinner band. And if it’s too easy, use a thicker band.
Just make sure there's tension in the band the whole time. Take another step back if you think there’s too much slack in the band. And it’s not challenging you.
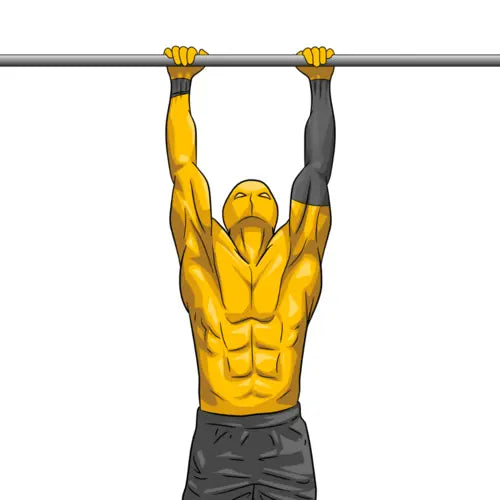
Dead hangs

This is how most people got their first pull up. Dead hangs develop grip strength in the arm to get the endurance you need for a pull workout. And with resistance bands, anyone can support the weight.
- Tie a resistance band to a straight bar
- Step in the band with one foot, then the other
- Grip the bar with hands shoulder-width apart
- Keep your legs off the ground, tucking them if the bar isn’t high enough
- Hold for 40-80 seconds
- Let go and rest for 40 seconds
- Repeat 3 times
As a complete beginner who's never touched a bar before, you might want more bands. Your goal right now as a beginner is holding on for 40 seconds. Then over time as you progress, you can reduce the band strength you use. And eventually remove them completely.
If you don’t have a normal calisthenics pull up bar near you, try: a tree branch, scaffolding (check it’s solid first), or playground equipment. Maybe you can find the back of a low-hanging basketball pole too. Whatever works for you.
Australian pull ups

With your lats and arms now developing strength as a beginner. Your other back muscles need work. These Aussie pull ups (or bodyweight rows) give you more practice with a longer range of motion.
- Grab a bar or rings at chest height, with hands shoulder-width apart
- Pull back your shoulders, and form a slight arch shape with your back
- Keep your legs straight, and core engaged (for stability)
- Focus on your back, and pull your chest to the bar (over 2 seconds)
- Hold at the top for 1 second
- Lower yourself back down, mirroring the movement in reverse, for 4 seconds
- Immediately start the next rep, repeating this 6-8 times
- Repeat this for 3 sets, with 40 seconds rest after each set
Not everyone has access to a bar at chest height. Calisthenics parks can be rare in some areas, or very far away. An alternative could be an empty bike rack, low hanging tree branch, conveniently built playground equipment, a barbell on a rack, or simply gymnastic rings.
If it’s too hard, take a step back so you’re more upright. And if it’s too easy, close the angle by walking your legs forward (which gymnastic rings are perfect for).
Regardless, the great thing about Australian pull ups is that anyone can do them. By changing the angle, you can easily do 6-8 reps. Even as a beginner.
Step 2 - Develop key upper body strength to later help the muscle up transition
So you now have a strong grip, basic pulling strength, and your lats are showing nicely.
For the transition part of the muscle up, which everyone struggles with, there’s one key exercise you can do…
Scapula pull ups
Many people are guilty of skipping this exercise. And they’re also guilty of spending months struggling with the muscle up for no reason. Don’t let this be you.
Scapula pull ups clean up some neglected back muscles you need to soar over the bar.
The key in this whole muscle up game is progressing strong (but safe). So make sure to get these steps right, and focus on the basics first.

- Grab onto a bar with hands shoulder-width apart, keeping your legs off the ground
- Slightly arch your back to create some tension
- 2 seconds pulling your shoulders down and chest up to the sky, keeping your arms straight
- Squeeze your back and hold for 1 second
- Lower yourself back to the start, reversing the movement for 4 seconds
- Repeat 6-8 times, for 3 sets, 40 seconds rest between sets
If you’ve followed the steps, and built the right strength, you shouldn’t need to adjust this exercise.
The beautiful thing is that it’s very simple. And mastering it will mean you have zero setbacks in the future. So months of struggle will turn into weeks of progress!
Step 3 - Get stronger in the full range of motion
You will now unlock the key strength to later on do the muscle up without assistance. It’s a very simple process and there’s no need to complicate it. As these three exercises will directly get you the muscle up…
Band-assisted high pull ups

- Tie a resistance band to a bar higher than your arms
- Step into the band with one foot, then the other
- Grab the bar with hands shoulder width apart
- Quickly engage your back, arching only very slightly, so your shoulder blades are together
- Pull yourself up for 2 seconds, like you’re slamming a car trunk with your arms, keeping them straight with a very slight bend at the elbows
- Once you’ve got as high as you can go, hold for 1 second
- Slowly lower yourself down for 4 seconds
- When you’ve reached the bottom, immediately go into the next rep
- Do this for 6-8 reps, 3 sets, with 40 seconds rest in-between
You want to get to the point where you can pull all the way up to your waist.
Naturally, when you go to do this, there might be a gap in your strength level that needs addressing. So if you can’t pull up to your waist; keep adding more resistance bands. And it should be easier.
Regardless how easy you find it, just pull as high as you can. You’ll progress over time.
Keep training these until you can pull all the way up to your waist. Then you’re pretty much doing muscle ups already. And you can see why these band-assisted high pull ups are key for the muscle up.
Band-assisted straight bar dips

Since the muscle up combines high pull ups and straight bar dips, we want to nail the dipping part of the move. And when using resistance bands, they’re easily doable.
To get on the bar in the first place, you can use a raised object such as a table, chair, box, parallettes, or simply have a lower bar. Then just jump up into the dip, and you’re there.
- Tie a resistance band to a straight bar
- Step into the band with one foot, then the other
- Get up over the bar
- Start the dip with tucked-in elbows, leaning forward slightly
- Lower yourself for 4 seconds so your midsection lightly touches the bar
- Hold for 1 second
- Push yourself up for 2 seconds
- Immediately start the next rep
- Do this for 6-8 reps, 3 sets, with 40 seconds rest in-between
Beginners who’ve not tried these before might struggle with just one resistance band. An easy fix is to use more than one resistance band at a time. So the exercise is easier, but still challenging.
To judge if it’s hard enough to build muscle, you should struggle to do your last rep. But not fail the rep.
Now, next comes the fun part…
Band-assisted muscle ups

Just like resistance bands help with straight bar dips, you can use them with the full muscle up too. Bands should be something everyone uses. As it’s almost a calisthenics “cheat code” to learn moves faster.
Doing the muscle up in full range of motion helps engage every muscle you need. And using bands to support you as you gain strength is how you get the unassisted muscle up.
- Tie a resistance band to a bar higher than your arms
- Step into the band with one foot, then the other
- Grab the bar with hands shoulder width apart
- Quickly engage your back, arching only very slightly, so your shoulder blades are together
- Pull yourself up for 2 seconds, like you’re slamming a car trunk with your arms, keeping them straight with a very slight bend at the elbows
- Lean forward and move your upper body into a straight bar dip position
- Push yourself up for 2 seconds
- Once in the top position, hold for 1 second
- Reverse the whole motion for 4 seconds until you’re back in the bottom position
- Start the next rep
- Do this for 6-8 reps, 3 sets, with 40 seconds rest in-between
TIP: Maintain perfect form to avoid injuring your rotator cuff and elbow joints. Do this by keeping your elbows as close to your body as possible. As flaring them out will damage your shoulders, elbows, and wrists.
Alright, now you’ve done the muscle up with perfect form! And don’t forget that if it’s too hard, just add more bands to make it easier.
You might be tempted to skip the other two moves and just train the band-assisted muscle up. Which is understandable, and you can do that, just make sure not to chicken-wing muscle up.
And if you do end up chicken-winging, be sure to go back to the basics and develop strength. Use the band-assisted high pull ups and straight bar dips. As they will give you the right strength you need.
Step 4 - Unlock the full muscle up without kipping (grinning from ear to ear)
If you’re concerned about “perfect form”, that’s alright. At this stage, your sheer strength and experience will mean you know the right technique. As strength is all you really need.
Now, once you’ve mastered the muscle up with resistance bands, and you’ve finished using the thinnest band you have. We both know what comes next…
Muscle ups
- Grab a bar with hands shoulder width apart
- Quickly engage your back, arching only very slightly, so your shoulder blades are together
- Pull yourself up for 2 seconds, like you’re slamming a car trunk with your arms, keeping them straight with a very slight bend at the elbows
- Lean forward and move your upper body into a straight bar dip position
- Push yourself up for 2 seconds
- Once in the top position, hold for 1 second
- Reverse the whole motion for 4 seconds until you’re back in the bottom position
- Start the next rep
- Do this for 6-8 reps, 3 sets, with 40 seconds rest in-between
So, you’ve done it! The muscle up is yours. And while you were at it, you developed more upper body strength than most of the world’s population.
Finally, no more doubts, no more frustration. You’ll be making muscle ups look easy. As well as having an aesthetic physique to match!

With all your dedication, you’ll get to 6 muscle ups… 8 muscle ups… 10 muscle ups… AND THEN…!
Reach a new level and ascend past the regular muscle up…

It’s time to scare yourself, and others, with demon-like upper body strength!
Weighted muscle ups
- Put on a weighted vest and add 1-5kg (as a beginner to weighted muscle ups)
- Grab a bar with hands shoulder width apart
- Quickly engage your back, arching only very slightly, so your shoulder blades are together
- Pull yourself up for 2 seconds, like you’re slamming a car trunk with your arms, keeping them straight with a very slight bend at the elbows
- Lean forward and move your upper body into a straight bar dip position
- Push yourself up for 2 seconds
- Once in the top position, hold for 1 second
- Reverse the whole motion for 4 seconds until you’re back in the bottom position
- Start the next rep
- Do 6-8 reps (if it’s your first weighted muscle up workout)
- Repeat for 3 sets, with 40 seconds rest in-between
Adding more weight to your muscle up training will make ALL pulling exercises lightwork. Trust me, when you take off the extra load and do a normal rep…
You’ll feel like you weigh a feather.
People might start saying something like “it’s unreal, how is he generating that much power?”
I’ll tell you how, it’s because you did what most people don’t want to do: dedicate themselves. You didn’t look for some special technique. You just committed to a simple progression!

As you follow these steps, the best way to stay committed is by sharing your progress. This is what your socials are meant for!
Be sure to share your achievements where you’ll be recognised for your efforts—in the gravgear telegram channel. And tag us @yellowdude.co on Instagram too.
Crush your muscle up goals and keep accelerating your calisthenics journey!